Historic Paint Effect Near St Helens
A softly aged paint effect in a Victorian Hall
The Commission
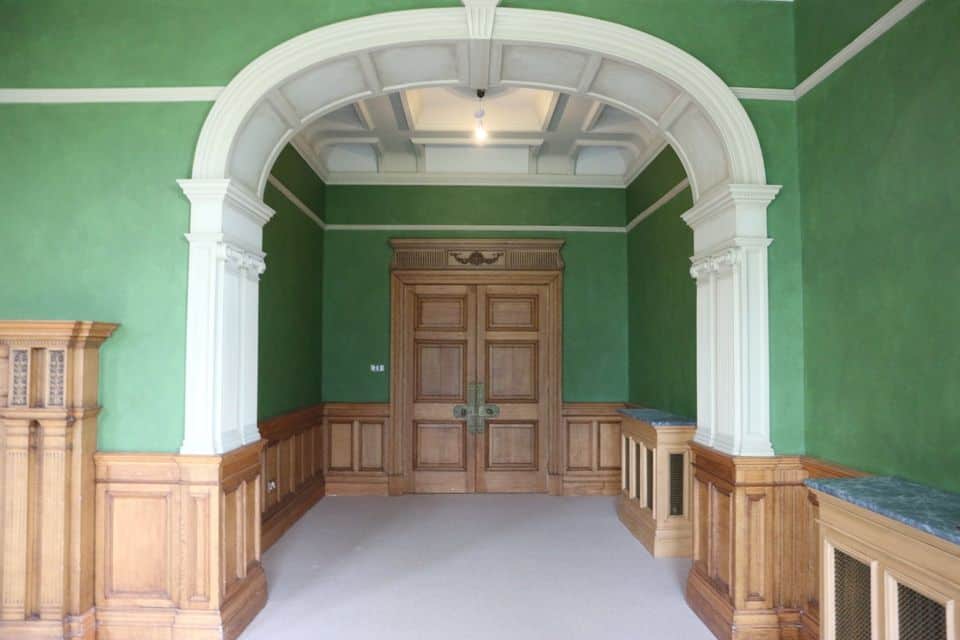
This was a really enjoyable challenge of a commission. The new owners of this Grade ll listed Victorian Hall built in 1898 wanted a total redecoration of the Evening Room. The brief was to mix historically accurate colours into softly aged paint effects, complimenting the original oak panelling and creating warmth and depth into the room.

The Colour Consultation and Paint Effects
There were several different aspects to this colour consultation. Firstly, on site with the clients determining what colours they actually like and what would sit well in the room. There were 4 main elements to take into consideration: Ceiling, columned arches, walls and existing oak panelling. As is so often the case with historic houses, decorating with flat paint just doesn’t cut it. In order to knit together the elements with the age of the property softly aged paint effects were required. This sounds relatively simple, but designing a paint effect with the correct end colour and depth and making it consistently uneven over vast walls is a challenge. If you’re not careful it can just look like a bad and patchy paint job. That’s where my studio comes into it’s own. I test every new paint effect I design on the walls of the studio. This way I can adjust glaze consistency and translucency.

Once the colours have been agreed on site with the clients and they have seen samples and photos of effects that I think they’d like and would work, I take all the information back to the studio to work on. For this commission I developed 2 different colours for the ceiling, one of which was quite a strong antiqued grey for the panels. The other, an aged ochre for the cornice and plaster work. The arches and columns had a paler ochre base coat applied with an antique umber glaze over the top to create a shadowed, aged depth. The walls were painted in a slightly more vivid green than the true Victorian green. Then a series of tinted glazes were applied over the base to create the softly aged Victorian green that we were after. Samples of all the above colours and effects were painted onto sample boards and posted to the client for their approval. I find there’s absolutely no point in painting up unrealistic samples that haven’t been fully tested first, It’s a recipe for disaster ! A point to note also with this commission, and many like it, is if I cannot get the exact colour I want mixed I will hand mix all the paint required on site. Which is exactly what I did with this job.

The Painting
I use a prep decorator on large commissions such as this one and a prep team on even larger jobs. This keeps the budget and schedule nice and tight. After masking, a full repair, fill and sand of all elements was required. With older buildings you can never be sure what repairs have previously occurred. There could be all sorts of resist and adhesion issues. Therefore I used a specialist adhesion primer on the walls first. Good job I did because there were indeed some blistering issues.Whilst I was bringing on the walls, arches and columns, the prep decorator worked on the ceiling. Once these areas were complete it was time to start basing the walls. 2 coats of acrylic base coat were left to dry fully over the weekend to accept the glaze coats. 3 of these were applied. It was up to me alone to apply the gaze coats, as the finish had to be consistent. 2 people painting the same effect will never have the same consistency. It will not work. Each elevation had to be glazed quickly and methodically – no stopping! In order to achieve the soft and evenly uneven effect.

Summary
The strength of the ceiling colours were totally absorbed by the overall finished decoration of the Evening Room. This is something to be taken into consideration when choosing colours – don’t go too light on ceilings and decorative woodwork. The whole scheme fitted together beautifully with the oak panelling and fulfilled the brief entirely as a warm, inviting evening room of a listed Victorian home.


